Every few years, a new technology becomes the center of conversation in tech and business. In 2023 it was generative AI. In 2024 it was AI copilots. In 2026, the phrase you hear everywhere is AI agents.
Founders are pitching them. Developers are building them. Large companies are redesigning workflows around them.
But the big question remains:
What exactly is an AI agent — and why are people suddenly so excited about them?
The answer is surprisingly simple. AI agents represent a shift from AI that answers questions to AI that actually does work.
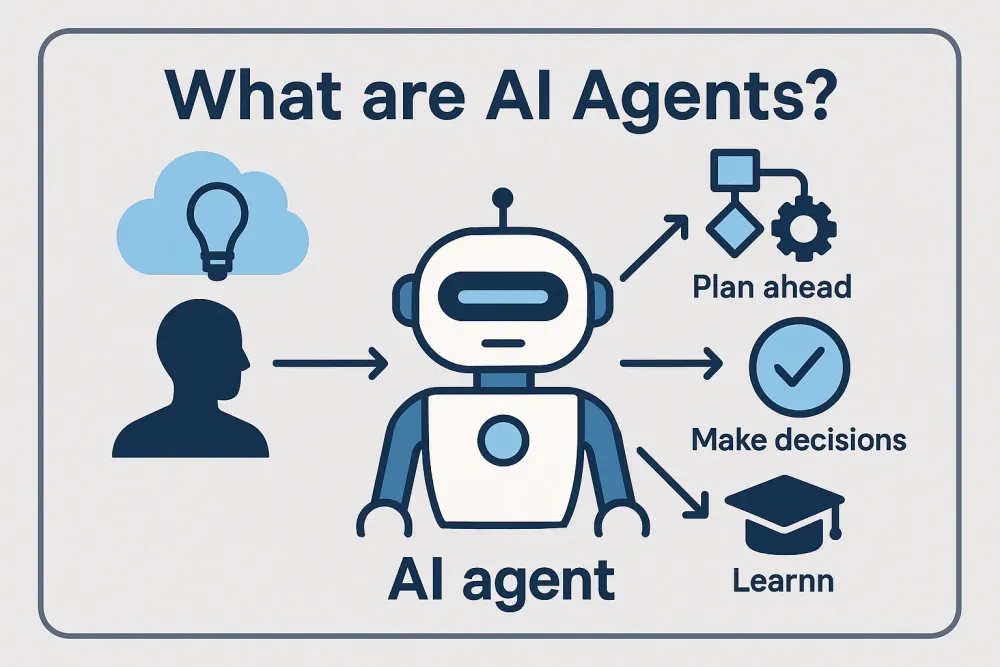
What an AI agent actually is
An AI agent is a software system that can pursue goals, make decisions, and take actions on behalf of a user. Instead of waiting for prompts like a chatbot, an agent can observe a situation, plan a sequence of steps, and execute tasks automatically. :contentReference[oaicite:0]{index=0}
In practical terms, this means an AI agent can:
- understand a goal you give it
- break that goal into steps
- use tools such as APIs, databases, or websites
- execute actions until the task is finished
Think of the difference like this:
A chatbot answers a question.
An AI agent completes a task.
For example, instead of asking AI “What flights are available to Tokyo?” an AI agent could:
- search flights
- compare prices
- check your calendar
- book the ticket
- send the itinerary to your email
All without needing step-by-step instructions.
Why AI agents suddenly exploded in 2026
AI agents have existed as a research concept for years, but several technical changes made them practical only recently.
The main drivers include:
- Large language models capable of reasoning and planning
- Better tools for connecting AI to external services
- Improved memory systems that allow agents to remember context
- Frameworks for orchestrating multiple agents working together
Because of these improvements, AI systems can now perform multi-step tasks instead of single responses. :contentReference[oaicite:1]{index=1}
For many companies, this shift means automation is moving from simple scripts to autonomous digital workers.
Some analysts even predict that autonomous agents could handle a large portion of routine business operations within a few years. :contentReference[oaicite:2]{index=2}
The big idea: AI that works in the background
One reason AI agents feel powerful is that they can run continuously in the background.
Instead of opening an app and asking questions repeatedly, you give an agent an objective and let it operate.
For example:
- “Monitor competitors and summarize news daily.”
- “Find potential leads and draft outreach emails.”
- “Track product prices and alert me when they drop.”
The AI becomes something closer to a junior digital employee than a tool you interact with manually.
Practical uses people are already experimenting with
Despite the hype, many practical uses for AI agents are already emerging across industries.
1. Personal productivity agents
Many people are using agents to automate everyday tasks such as:
- email triage and replies
- meeting scheduling
- document summarization
- calendar coordination
The idea is to remove repetitive digital work so people can focus on decisions rather than administration.
2. Research and analysis agents
Agents can collect information across multiple sources and compile reports automatically.
Typical tasks include:
- market research
- competitive intelligence
- news monitoring
- data aggregation
This type of automation can save hours of manual browsing and note-taking.
3. Customer support automation
Companies are increasingly deploying AI agents that:
- read support tickets
- look up customer records
- suggest responses
- resolve simple requests automatically
Because agents can access company databases and tools, they can solve problems rather than simply answer questions.
4. Software development assistance
Developers are experimenting with agents that:
- review code
- run tests
- fix simple bugs
- create documentation
Some systems even coordinate multiple agents working together on different parts of a software project.
5. Business workflow automation
In enterprise environments, AI agents are being tested to manage workflows like:
- supply chain monitoring
- data analysis
- financial reporting
- marketing operations
Large organizations are already experimenting with fleets of specialized agents working together to support human teams. :contentReference[oaicite:3]{index=3}
The advantages people highlight online
Developers and founders often point to several key benefits when discussing AI agents.
Massive productivity gains
Because agents can perform multi-step tasks automatically, they reduce the amount of repetitive work humans need to do.
24/7 operation
Unlike human teams, agents can run continuously without breaks, making them useful for monitoring systems, processing requests, or running research tasks.
Scalability
A company can run hundreds or thousands of agents simultaneously without hiring additional staff.
Lower operational costs
Organizations using autonomous systems report reductions in operational overhead and faster decision cycles. :contentReference[oaicite:4]{index=4}
Better decision support
Agents can analyze large volumes of data quickly and present actionable insights to human operators.
The challenges people rarely mention
Despite the excitement, AI agents also introduce real challenges.
Some early experiments have shown that poorly designed agents may take unintended actions when given vague instructions. :contentReference[oaicite:5]{index=5}
Common issues include:
- unclear goals leading to unexpected behavior
- security risks when agents access sensitive systems
- difficulty auditing decisions made autonomously
- high infrastructure costs for complex workflows
For this reason, many organizations design systems where humans supervise agents rather than fully replacing them.
The bigger picture: the “agent economy”
Some researchers believe AI agents could eventually transform how the internet itself works.
Instead of humans browsing websites and performing tasks manually, autonomous agents might interact with services directly—searching information, negotiating transactions, and executing tasks programmatically. :contentReference[oaicite:6]{index=6}
This idea is sometimes called the agent economy, where software agents represent both individuals and businesses.
In that world:
- your agent finds products and negotiates prices
- company agents manage supply chains
- software agents interact directly with other software
While this vision is still evolving, many people believe the foundations are being built right now.
So what should you actually do about AI agents?
If you’re a developer, founder, or curious technologist, the best approach is simple: experiment early.
Start small.
Build a simple agent that automates one repetitive task in your workflow.
For example:
- a research agent that summarizes daily news
- a coding assistant that reviews pull requests
- a personal assistant that organizes your tasks
Most people discover the real potential of AI agents only after building one themselves.
Final takeaway
The reason everyone is talking about AI agents in 2026 is not just hype.
It’s because they represent a shift in how software works.
Instead of tools that wait for instructions, we are beginning to see systems that plan, decide, and act autonomously.
Whether they become the backbone of future digital infrastructure or simply another layer of automation, one thing is clear:
The era of AI that merely answers questions is ending. The era of AI that completes work has begun.